

Host Your Portfolio Website for Free: Lifetime Custom Domain Included!
Unlock Lifetime Free Portfolio Hosting with GitHub, Cloudflare, and register.com.np


You can host your static website for a lifetime, absolutely free, using Github, Cloudflare and Nepal domain register. register.com.np provides free .com.np custom domains, while GitHub Pages offer free hosting for your content. To connect your custom domain to GitHub Pages, leverage Cloudflare's DNS service, which not only acts as an intermediary for accessing your site but also provides essential features like security and speed enhancements.
So we will first Register our domain name using register.com, then we will Configure Cloudflare and finally, we will set up Github and Upload our portfolio to Github and host our site. (It includes in-depth details from account creation to deployment).
If You already have a Custom Domain Name registered you can skip the registration part.
Register .np Domain Name
The register.com.np is the official domain registrar for Nepal's ccTLD (.np). They offer free domain registration for .np domains. You need the front and back sides of your citizenship and a cover letter justifying why you need a domain. I will give u a sample(click here), you can customize it accordingly.
Login or Register
You need an account to register your domain, if you haven't got one already. If you have an account Sign in if not click on "Create User" to create a new account.
Login in to search for available domains.

Check for domains Availability
click here, to go to the website and check for available domains.

if its available it will show you
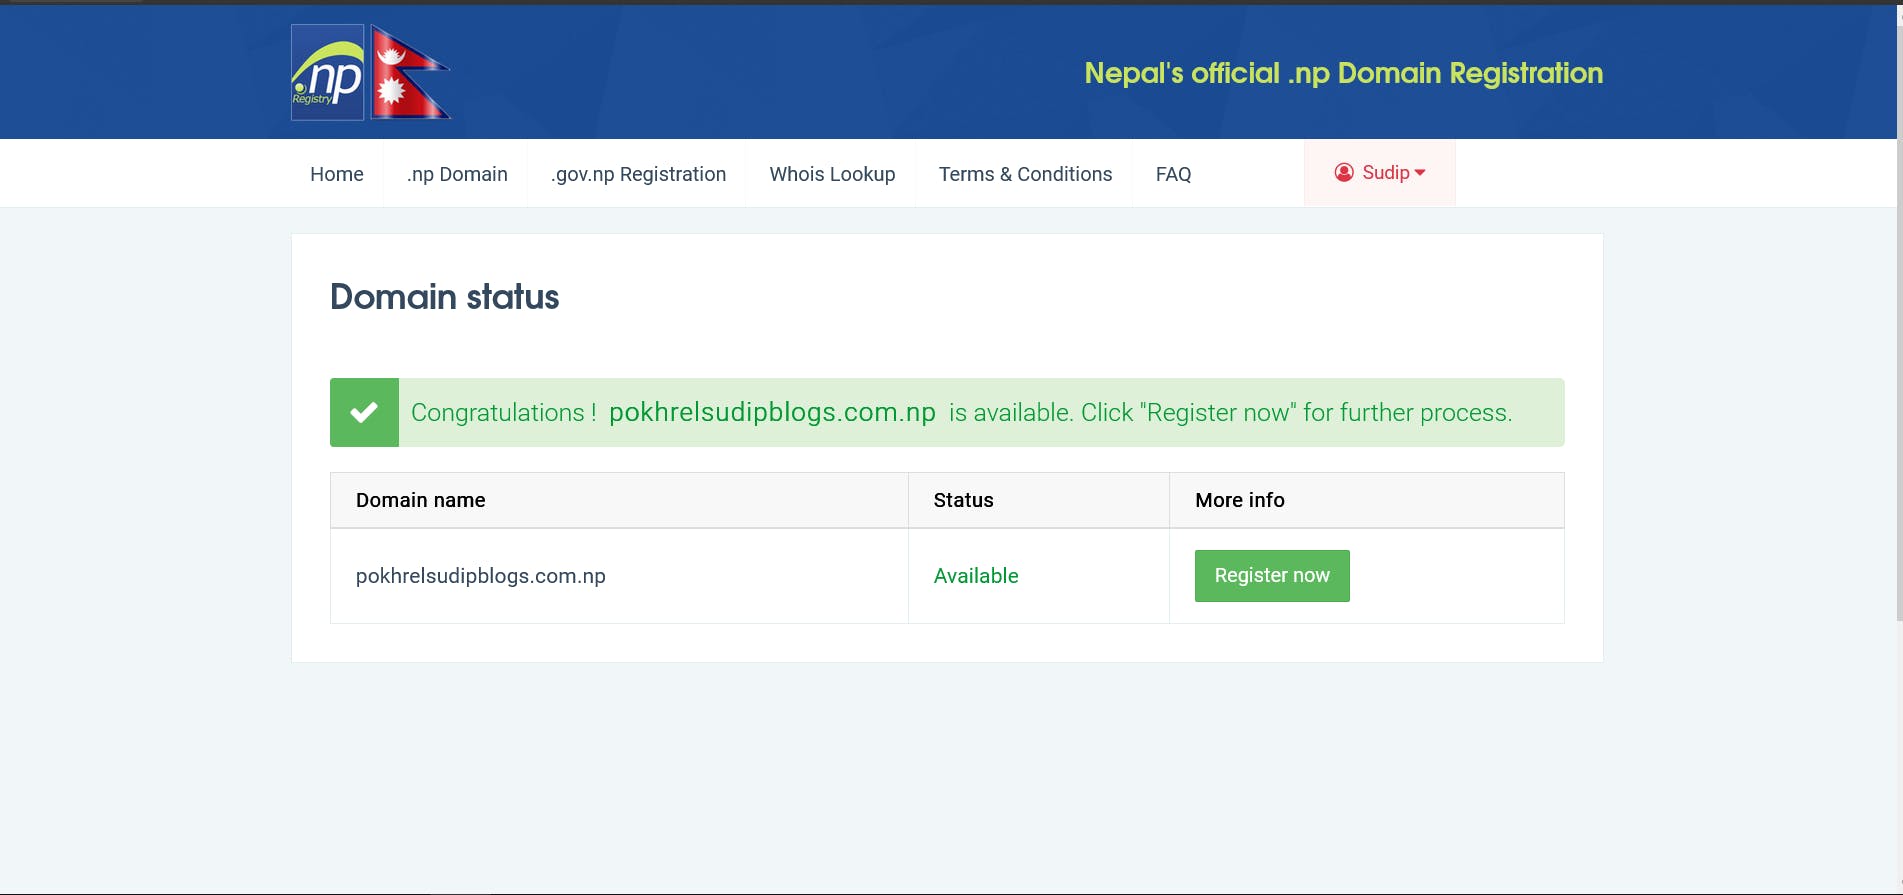
Now, click on register now to register your domain name
Fill out the form to
Fill in your details and click on "Save & Continue".
 ❗Remember, in the Name server section use eg. primary(
ns1.hosting.net.np)and secondary(ns2.hosting.net.np) name servers, which we will change later while configuring Cloudflare.Add your Documents
Add your Documents including Your Citizenship photo with both front and back in a single picture and a photo of your cover letter(sample).
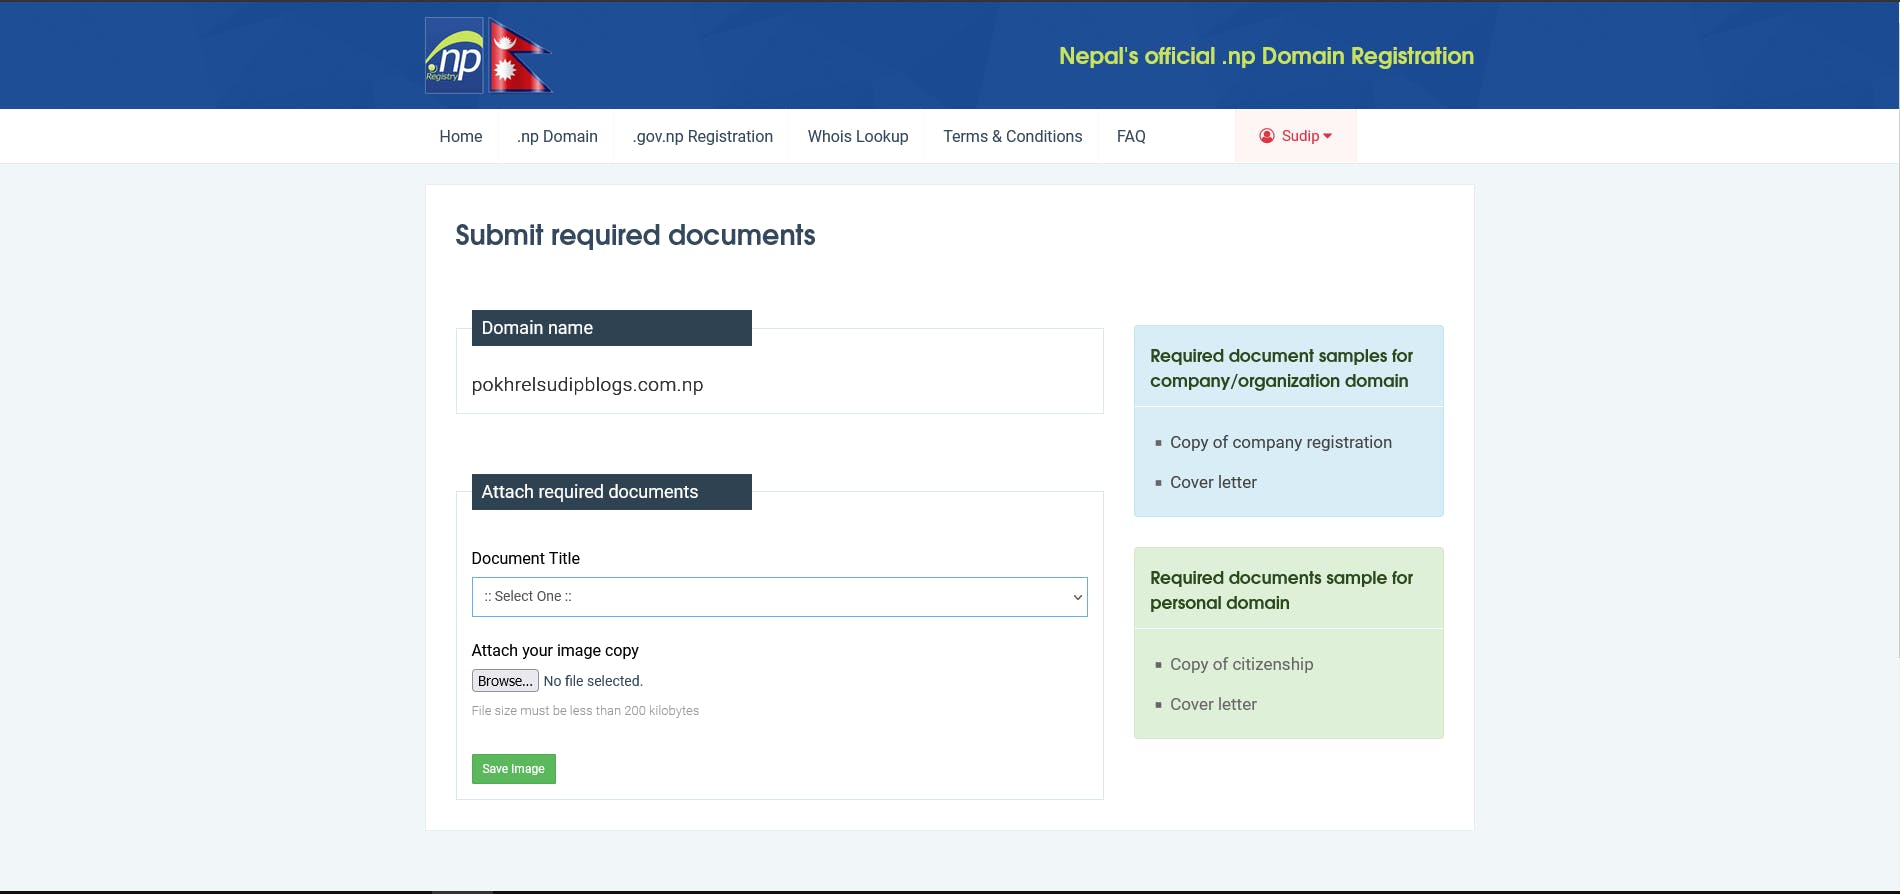 ❗Choose Document Type, and attach in the image format. For separate front and back citizenship, select Document Title and save each image.
After inserting press "submit" and wait for verification.
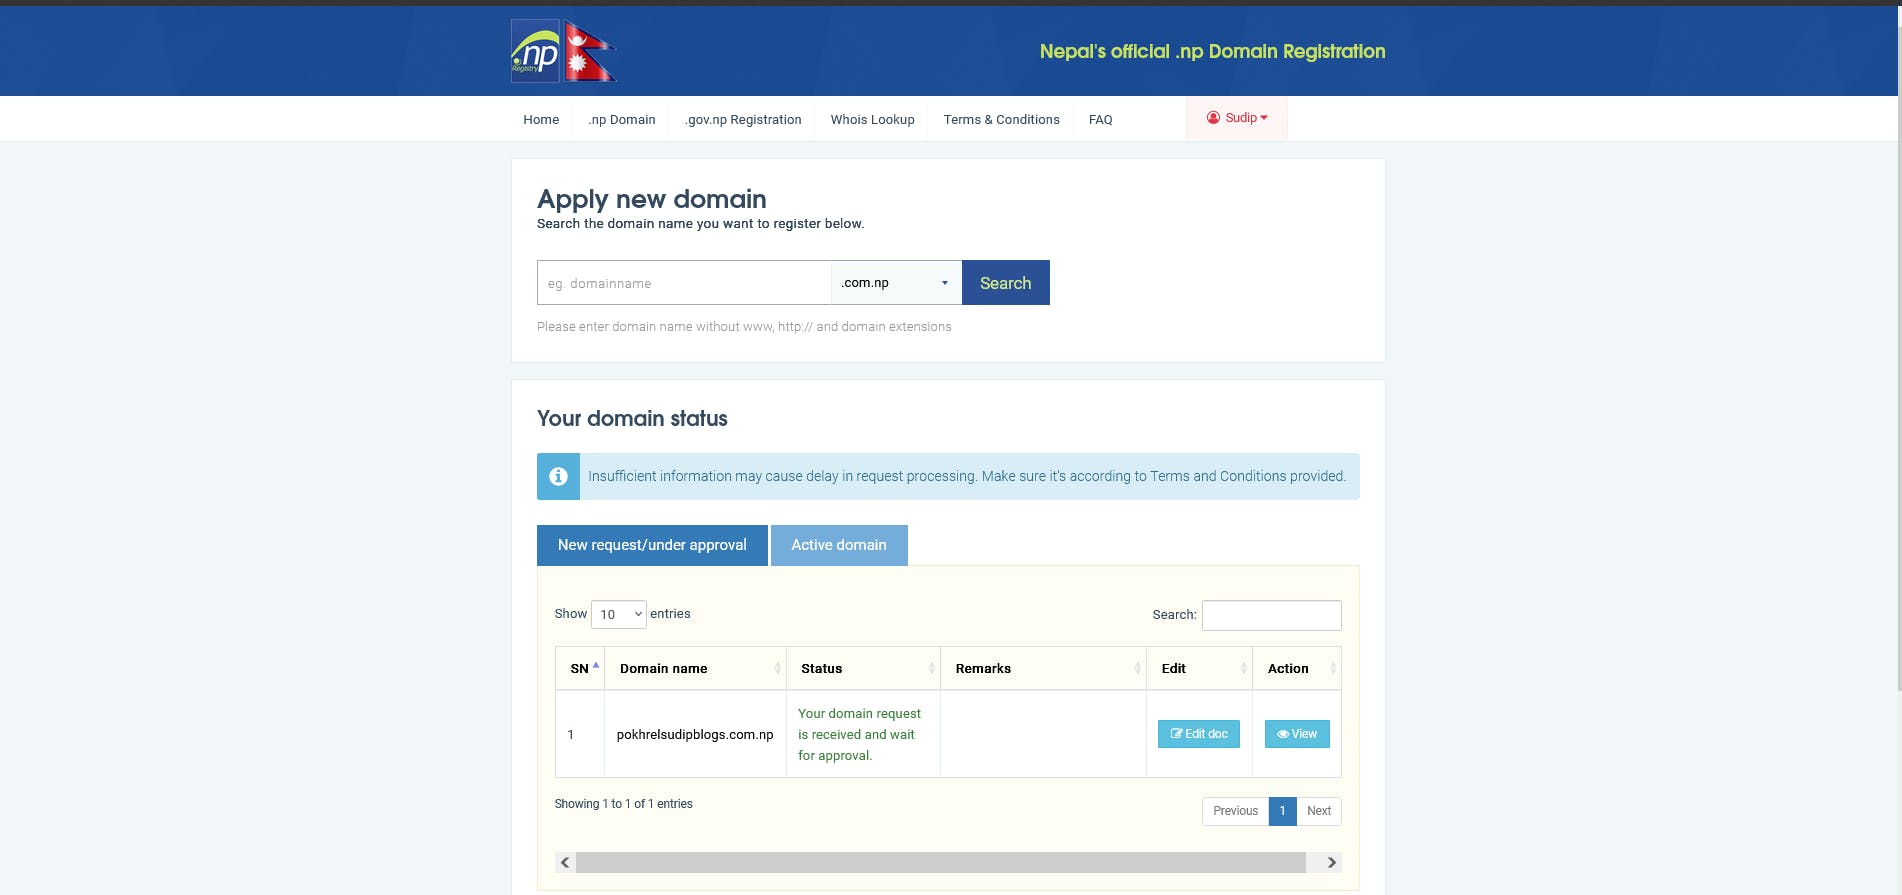
Usually domain registration may take up to 24 to 48 hours for verification. you will get personal mail if it's either accepted or rejected. It usually gets rejected if the domain name does not match your name or documents. I would suggest you choose a domain similar to your name.
Wait till your domain gets registered to go to the next step.
Cloudflare Setup
To connect your custom domain to GitHub Pages, We use Cloudflare's DNS service, which not only acts as an intermediary for accessing your site but also provides essential features like security and speed enhancements.
We will navigate to your DNS provider(Cloudflare)and we will create A record and apex domain to the IP addresses for GitHub Pages.
Signup/Login to Cloudflare
Click here, to create a Cloudflare account if you haven't already got an account. Login into Your account if you already got an existing one.
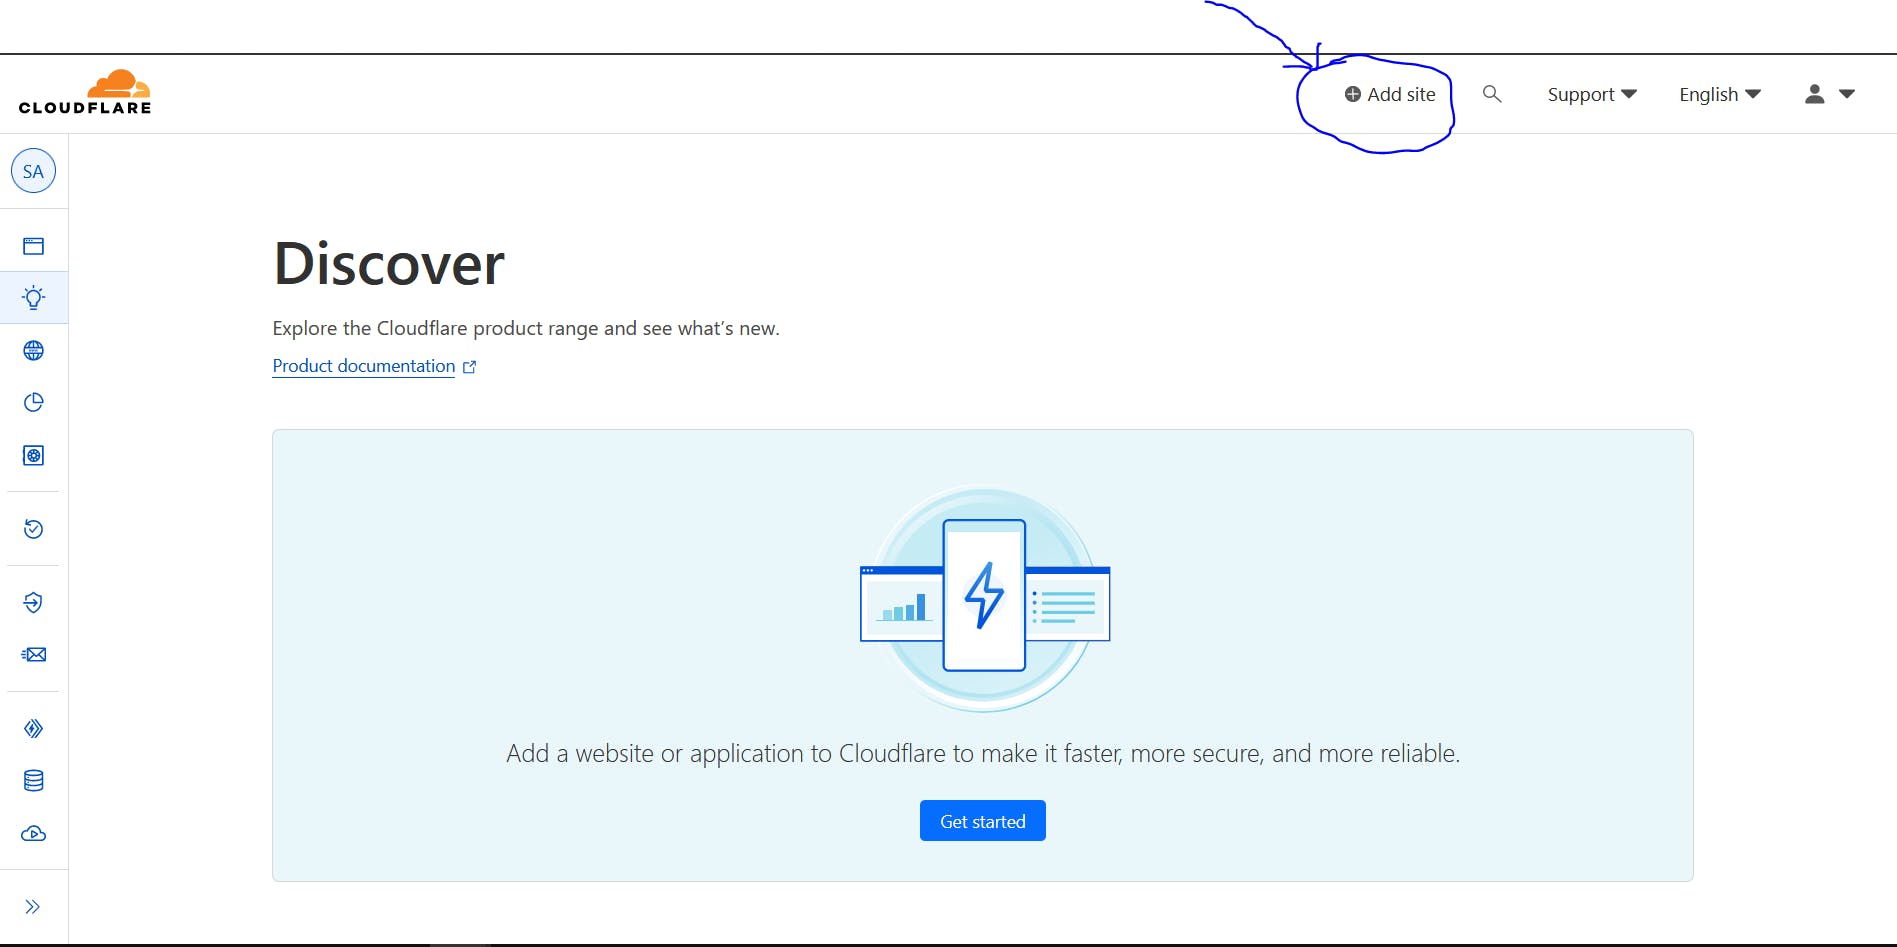
This is the Cloudflare dashboard, with "add site" at the top of your dashboard
Add Site
click on Add Site (The domain name we registered earlier using register.com.np) to add your site to Cloudflare.

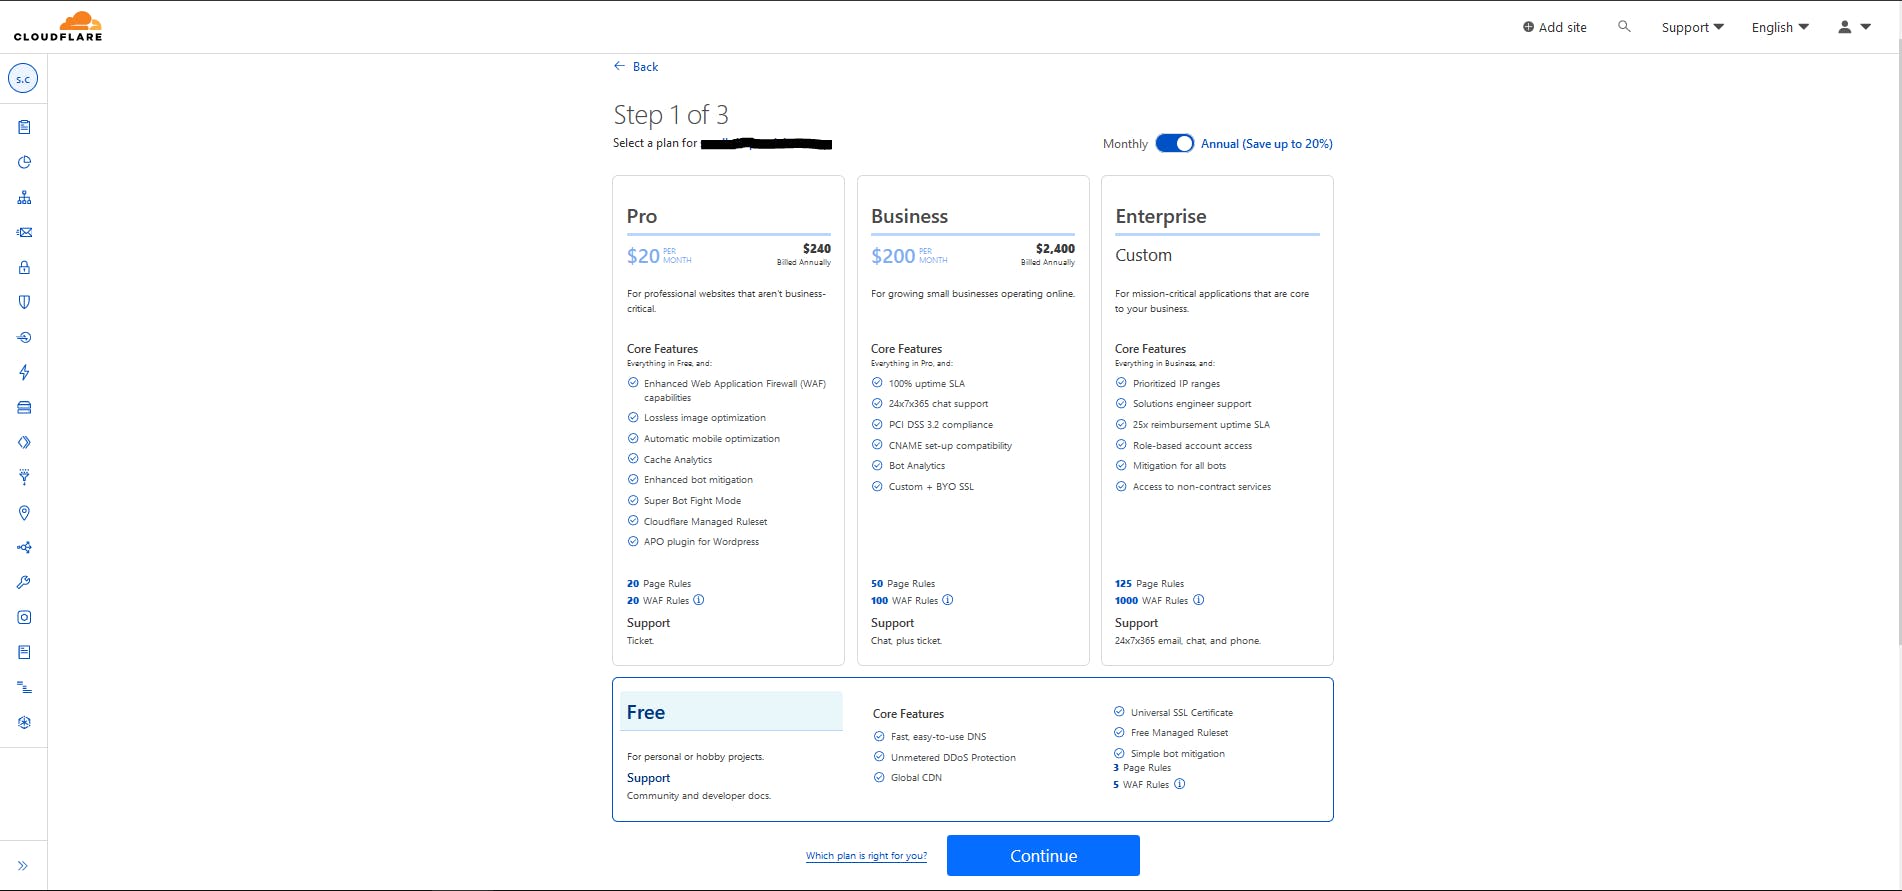
Choose the Free Cloudflare plan
Choose the Free Cloudflare plan, which provides various services free of costs
Add Records
Click on "add record" to add DNS records. Here we will add IP addresses for GitHub Pages.

Add
CNAMEType record for our website "example.com.np" to redirect to "www.example.com.np".add
Atype record for our website and map to IP addresses for GitHub Pages.💡185.199.108.153 185.199.109.153 185.199.110.153 185.199.111.153
Final Records
The final Record must be like below. Click "continue" to move forward.
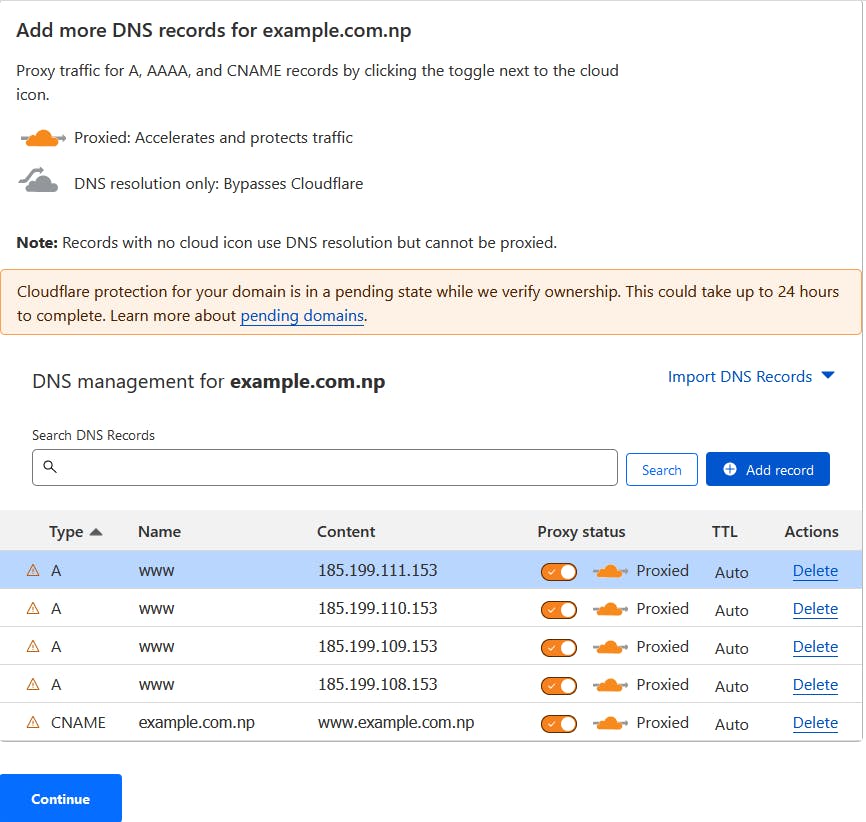 💡Replace example.com.np with your domain name
Change your Nameservers
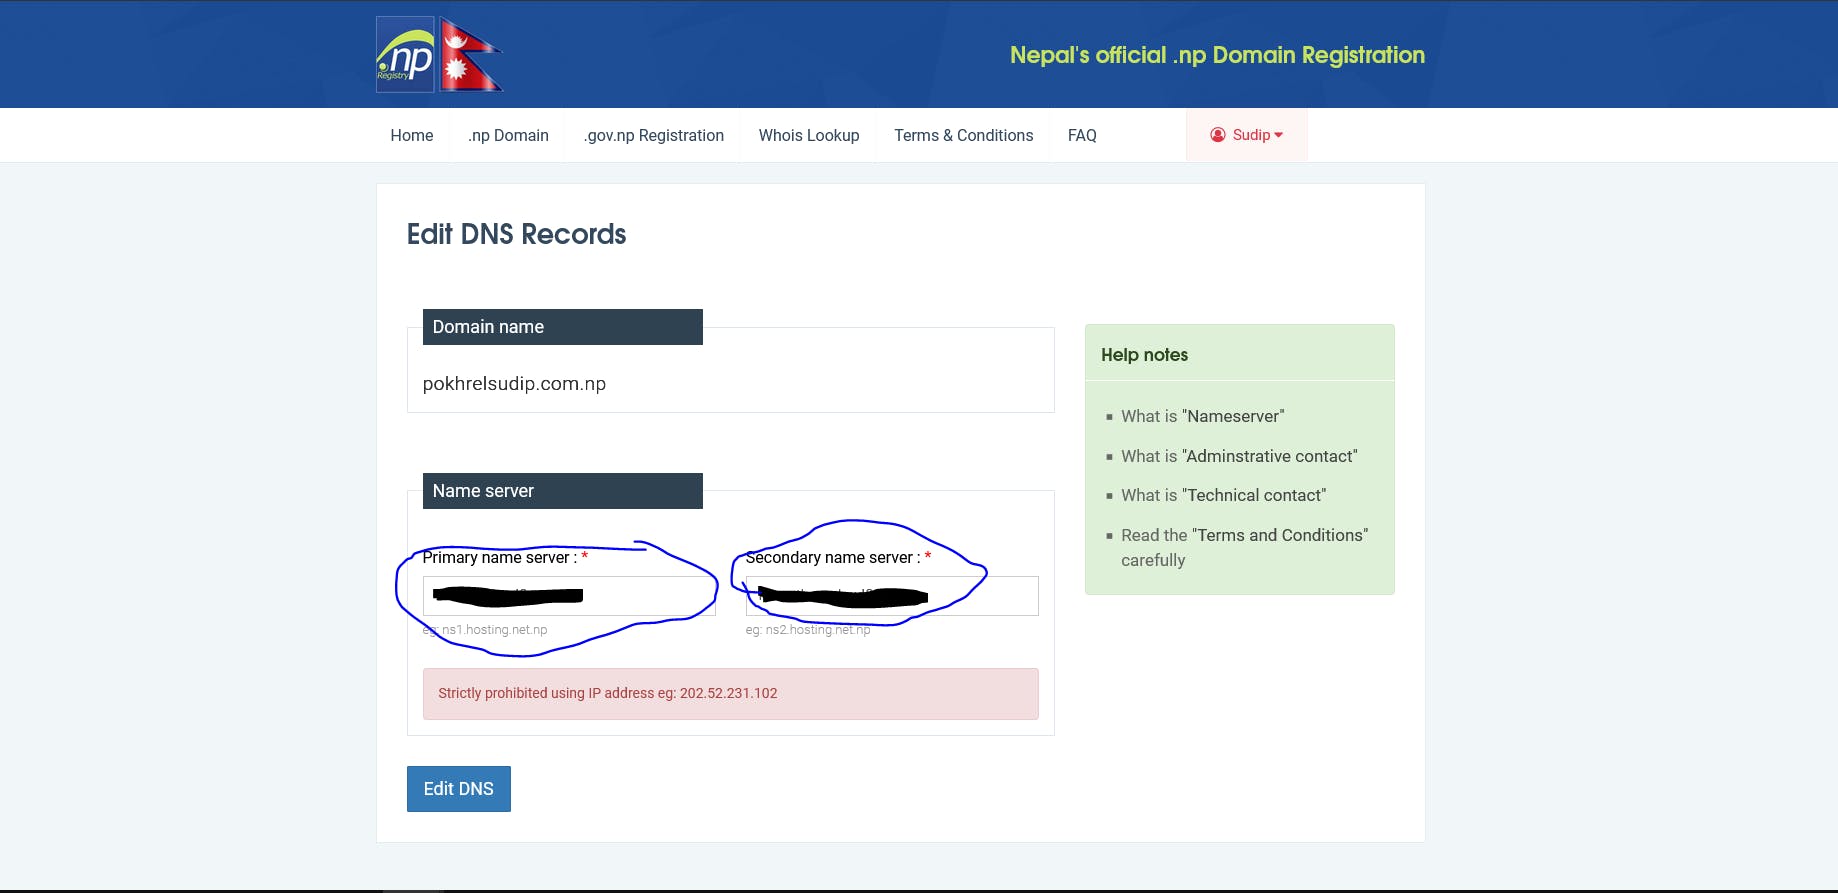
Earlier I told you to use eg. nameservers while registering your domain using register.com.np. Now you will change the nameserver in your register.com.np with the given nameservers in Cloudflare.
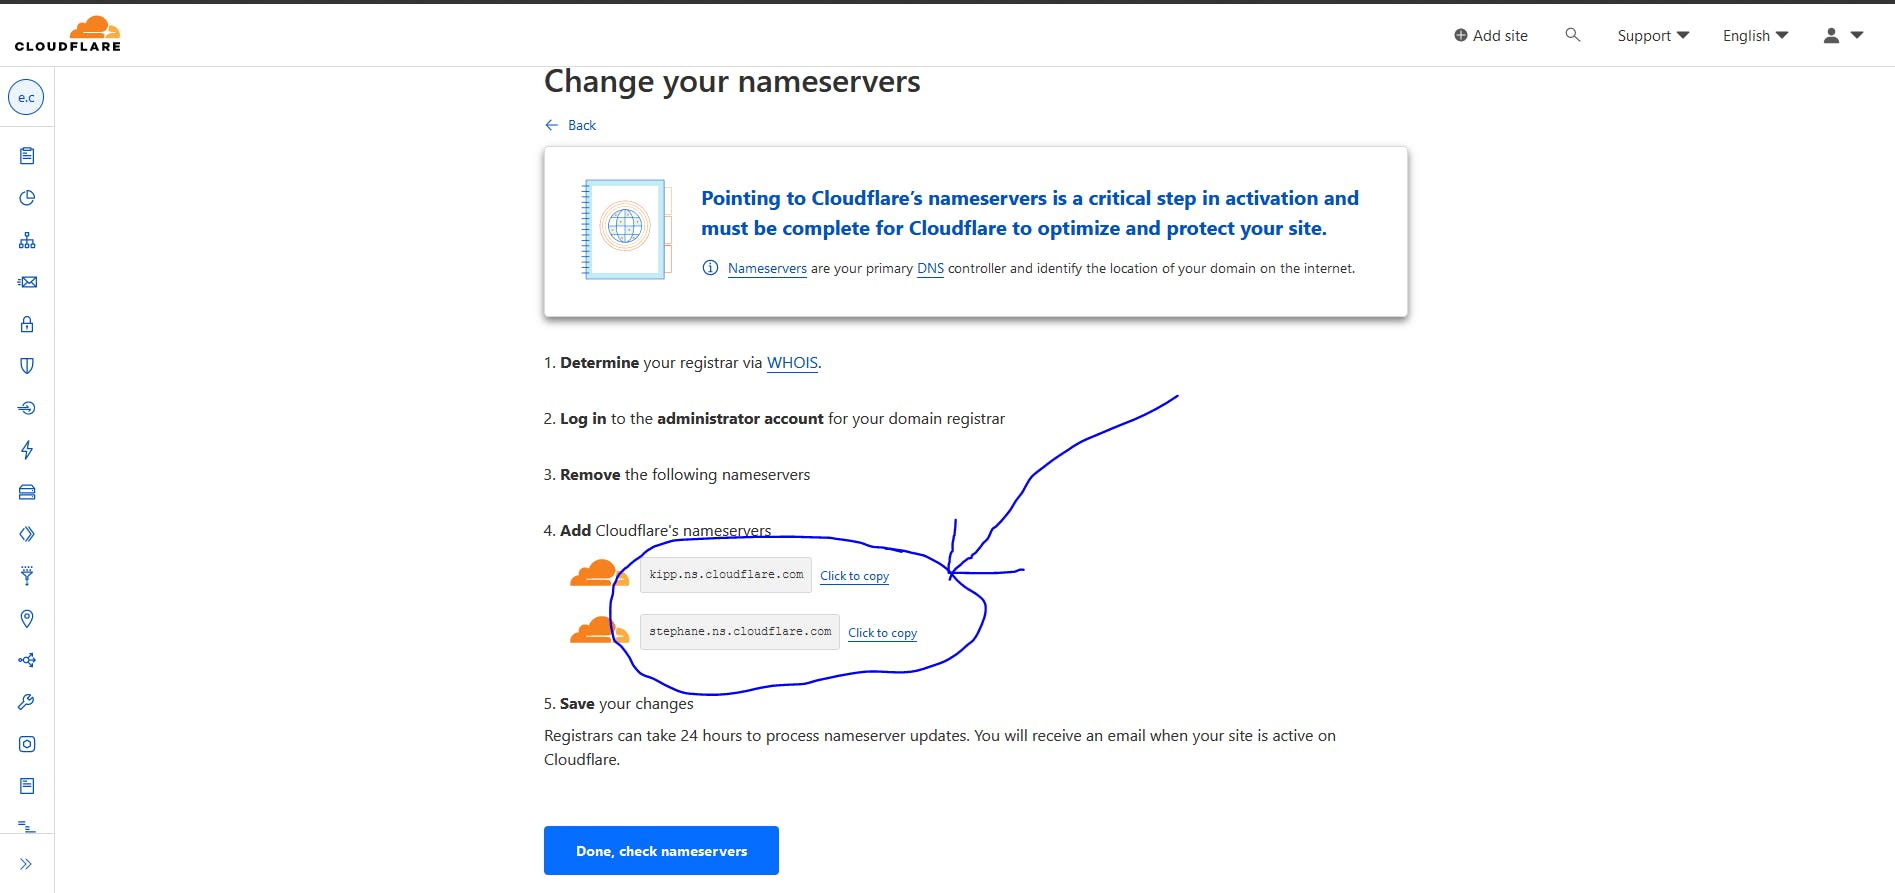
Copy Your nameserver(could be different in your account)
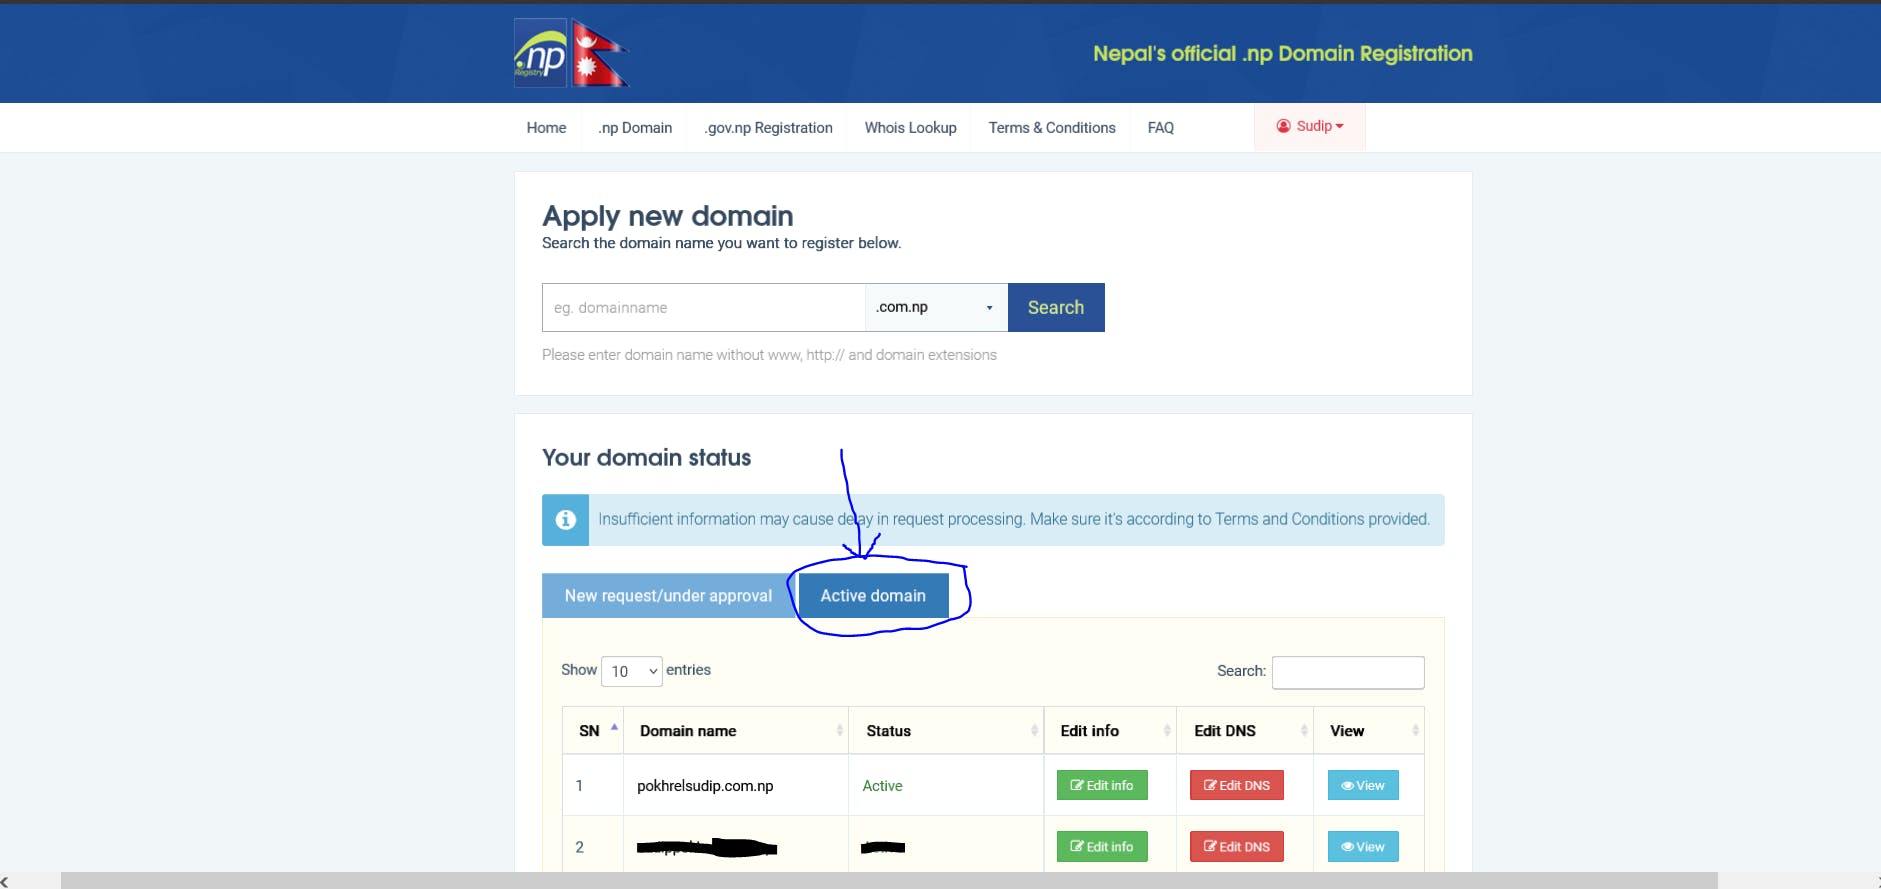
Goto register.com.np and click on "account" and go to "Dashboard"

Click on ''Active Domain'' to view your active domain. Then click "Edit DNS" to Edit the DNS
Paste both DNS that you copied from Cloudflare.
It will take some time to configure, but you can go ahead with the next step.
Now, go back to Cloudflare where you will do the remaining configurations.
❗If you have registered your domain name in other than "register.com.np", go to your domain name register and change its Nameservers with Cloudflare Nameservers.
Others Configurations
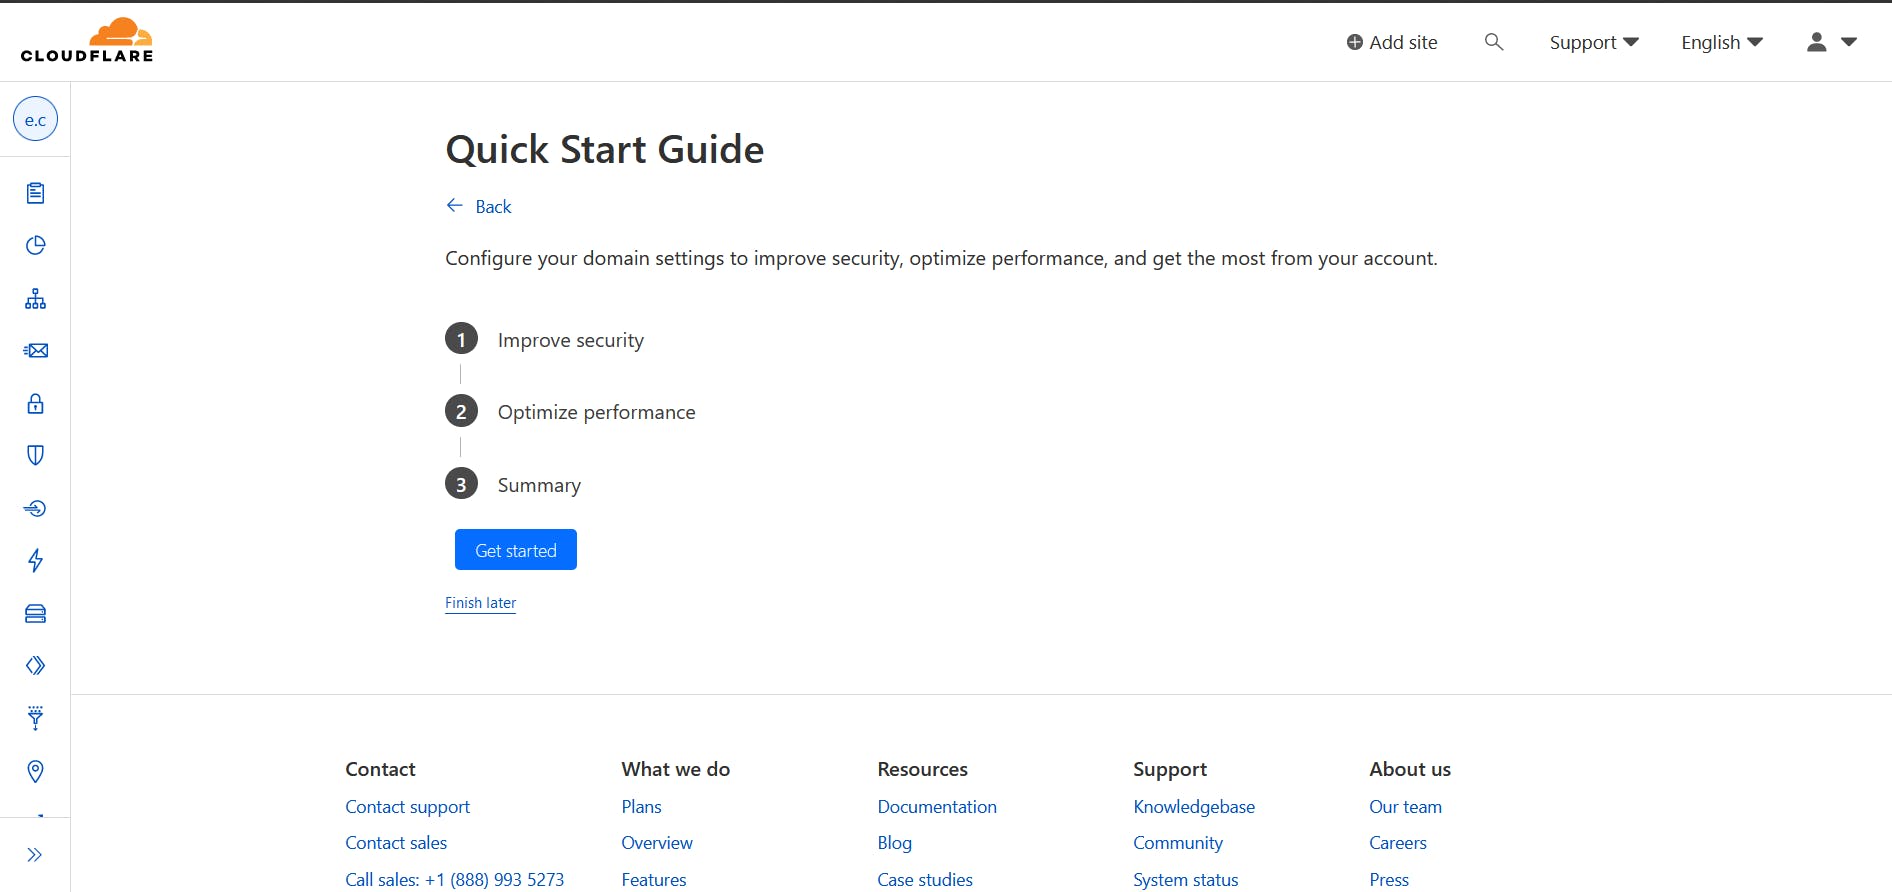
Click on Get Started to get going
Automatic HTTPS Rewrites "ON"

Always use HTTPS "ON"
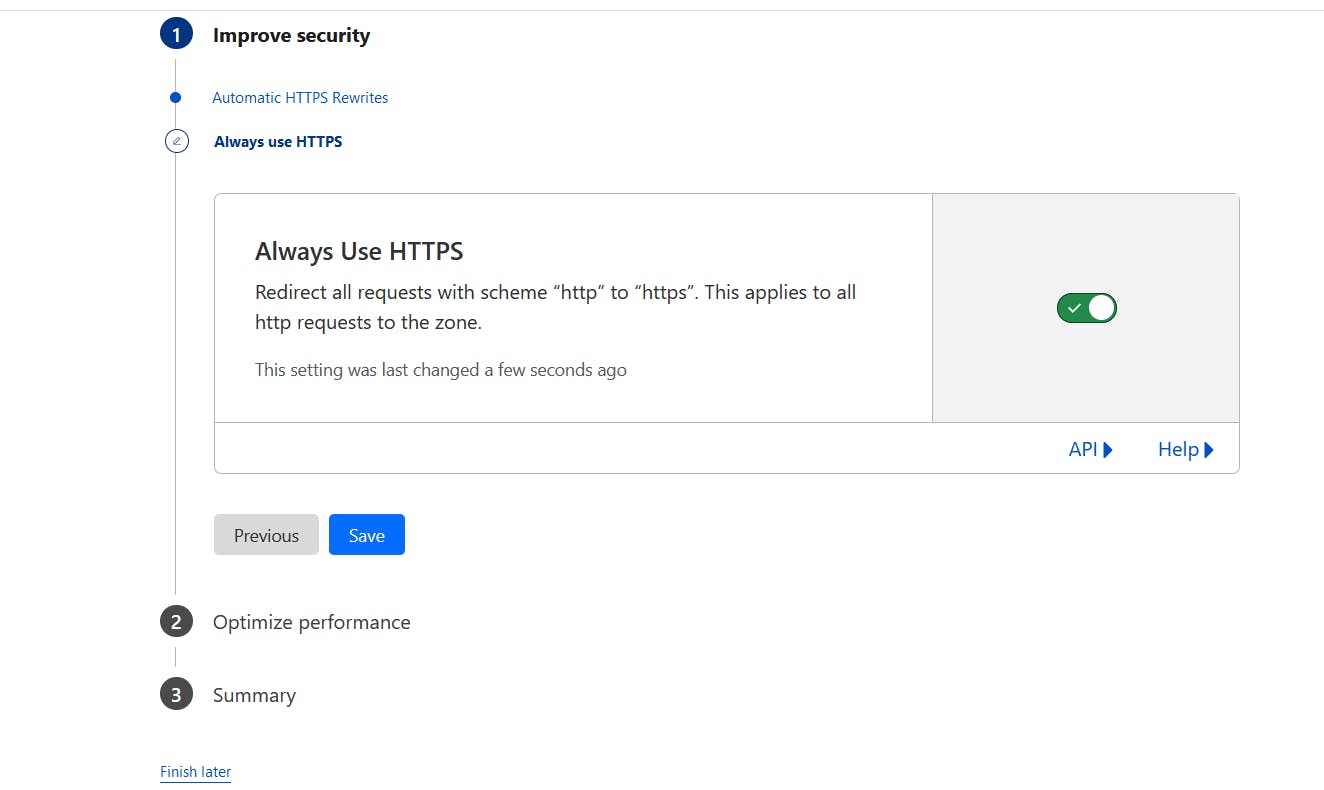
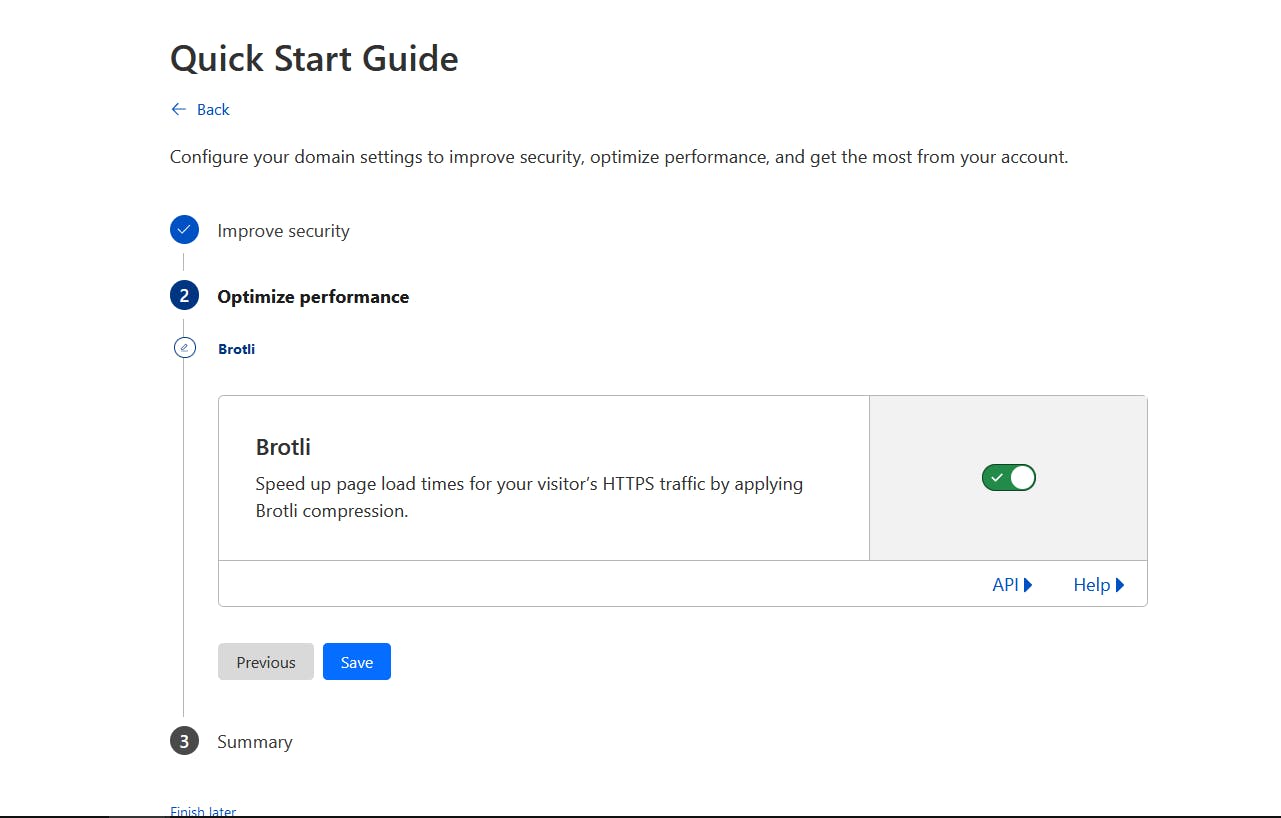
Brotli "ON"
Finish

your Setup is finished, you can always customize other features of Cloudflare as you need.
Now Your Cloudflare configuration is successful. Configuration may be instant or could take 24-48 hours to configure successfully.
Host your website with GitHub
Now it's time to host our Website using GitHub Pages. To do so, First, we'll need to log in to our GitHub account (or create one if you don't have it yet). After that, we'll create a repository specifically for our portfolio. Next, we'll upload our local project to the remote GitHub account using Git.
Once that's done, we'll proceed to host the project using GitHub Pages
Login/Signup to GitHub
Login to your Github account if you already got a GitHub account, if you don't have to create a new GitHub account
click on "log in" to log in with your credentials if you already have an account.
click "Signup" to create a new account
Fill in your credentials, Solve the given puzzle and click on "Create account"

Verify Your email
Enter your verification code sent to your email.
Choose your preferences
Choose your Preferences as your desire, You can change them anytime you need.

Choose Free plan
Click on "continue for free" to use the free version

You Have now Successfully created a GitHub account and Logged in to it. The dashboard looks as below

Create Repository
We will Create a New Repository, we will fill in the Repository name & Description as we wish. You can also add README too as your preference. And click "Create Repository" to create.
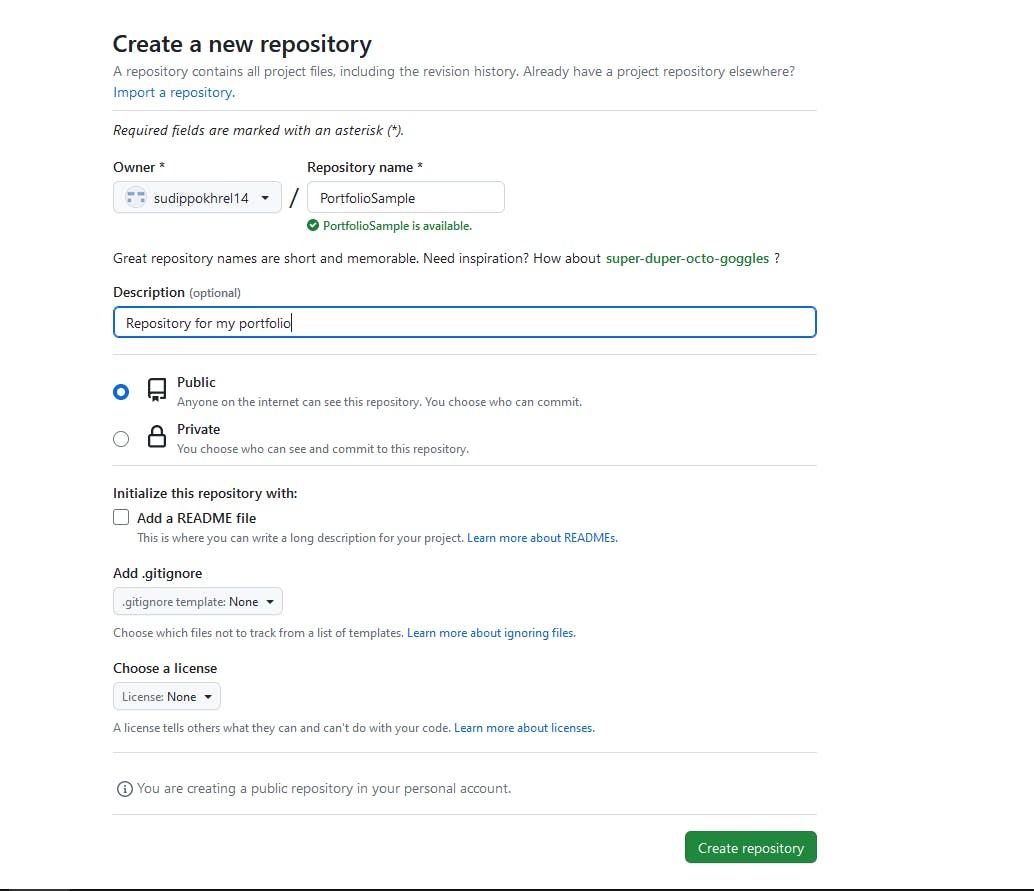 ❗Make sure your repository is public(Github Free Version will only allow you to host your Project if the repository is only public)
This is The repository you have created. Copy the HTTPS of your repository.
https://github.com/sudippokhrel14/PortfolioSample.git- This is for my repository copy for yours.Add Local Project to GitHub
You have two options for adding local projects to GitHub. The first is using the "uploading an existing file" feature, which allows direct uploading.
However,
I recommend using Git for version control. With Git, you can update your portfolio on your local machine and then push those changes to the remote repository, automatically configuring the portfolio website with the latest updates. This way, you can easily manage and track changes to your project.download Git from the site. click here, to to download the latest (2.41.0) 64-bitGit for Windows. click here, if you want to explore other versions. and install it into your device.
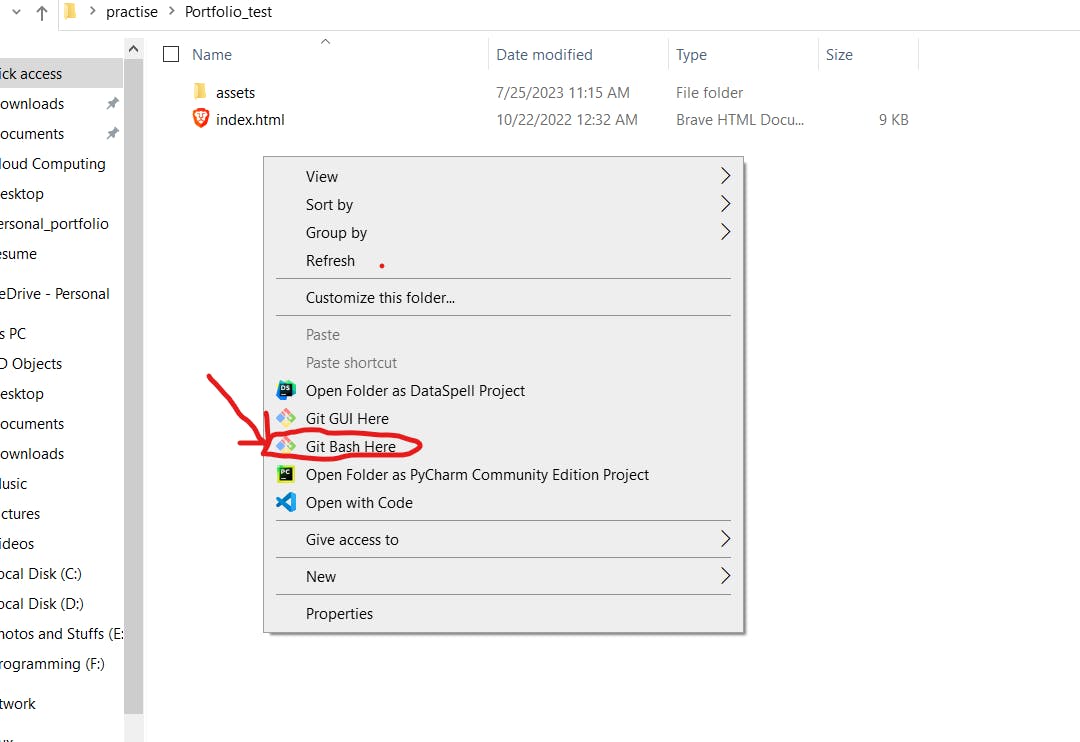
Go to your Project location on your Local Device and "right click" on your mouse. and click on the "git bash here" to open the git terminal.
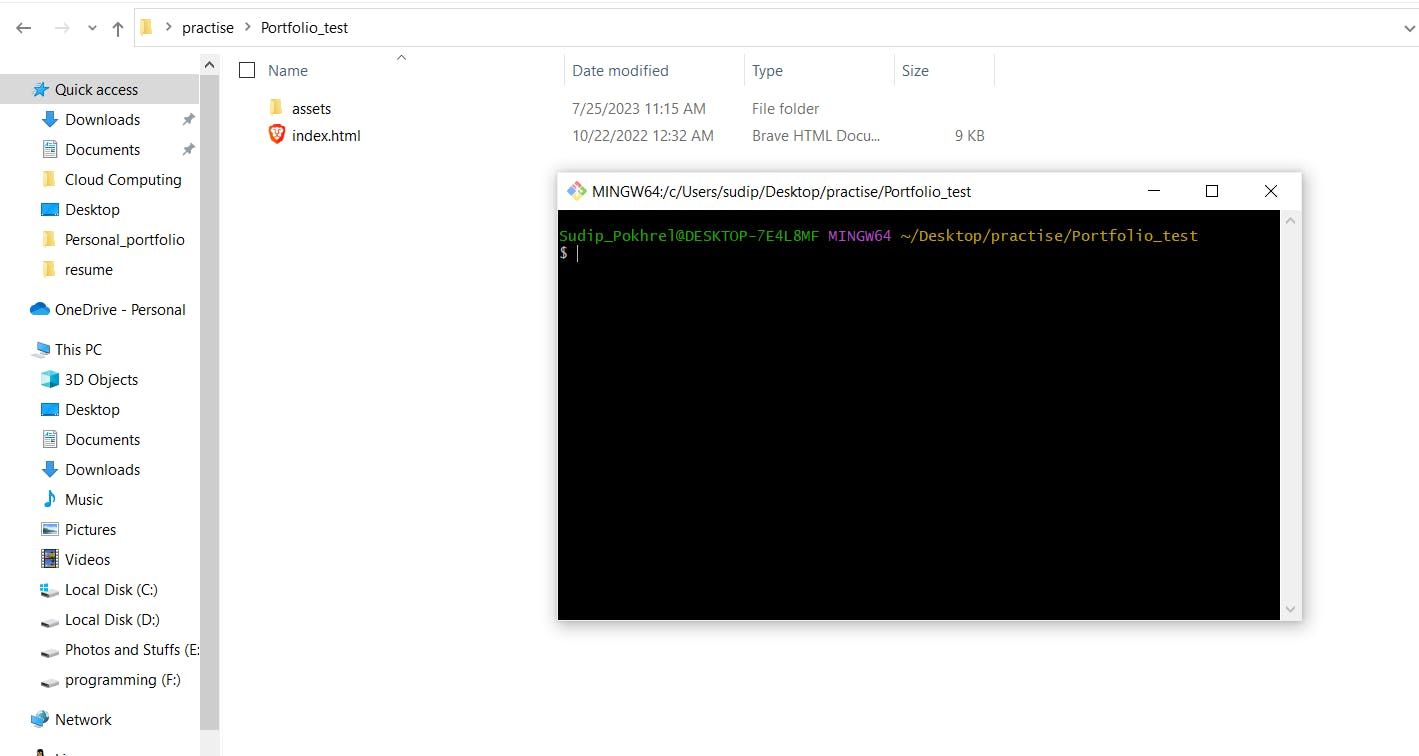
The terminal will be
Git Configuration with your GitHub Account.
This is configured only once for your device
git config -- globaluser.name “John Doe”- This sets the usernamegit config -- globaluser.email “johndoe@example.com”- This sets the email address.We will initialize git for our project.
git init- This will initialize git for our project. (this process is done only once for a project)Add git and commit the changes
git add .- This will add a project to the staging areagit commit -m "This is my first commit"- This will add a project to the local git directoryConnect Project with our remote GitHub repository
git remote add origin <HTTPS of your repository>- This will connect our remote GitHub repository with the local Git directory.❗replace<HTTPS of your repository>with The HTTPS you copied from your repository earlier. Eg.https://github.com/sudippokhrel14/PortfolioSample.git-for my repositoryPushing our Project into Github remote repository.
git push origin main- this will push our project from our local git directory to the remote GitHub repository.
This will add your Project to your GitHub repository.
Hosting with GitHub Pages
We host our repository using GitHub pages. For that go to your repository in GitHub
Click on setting

Goto Pages
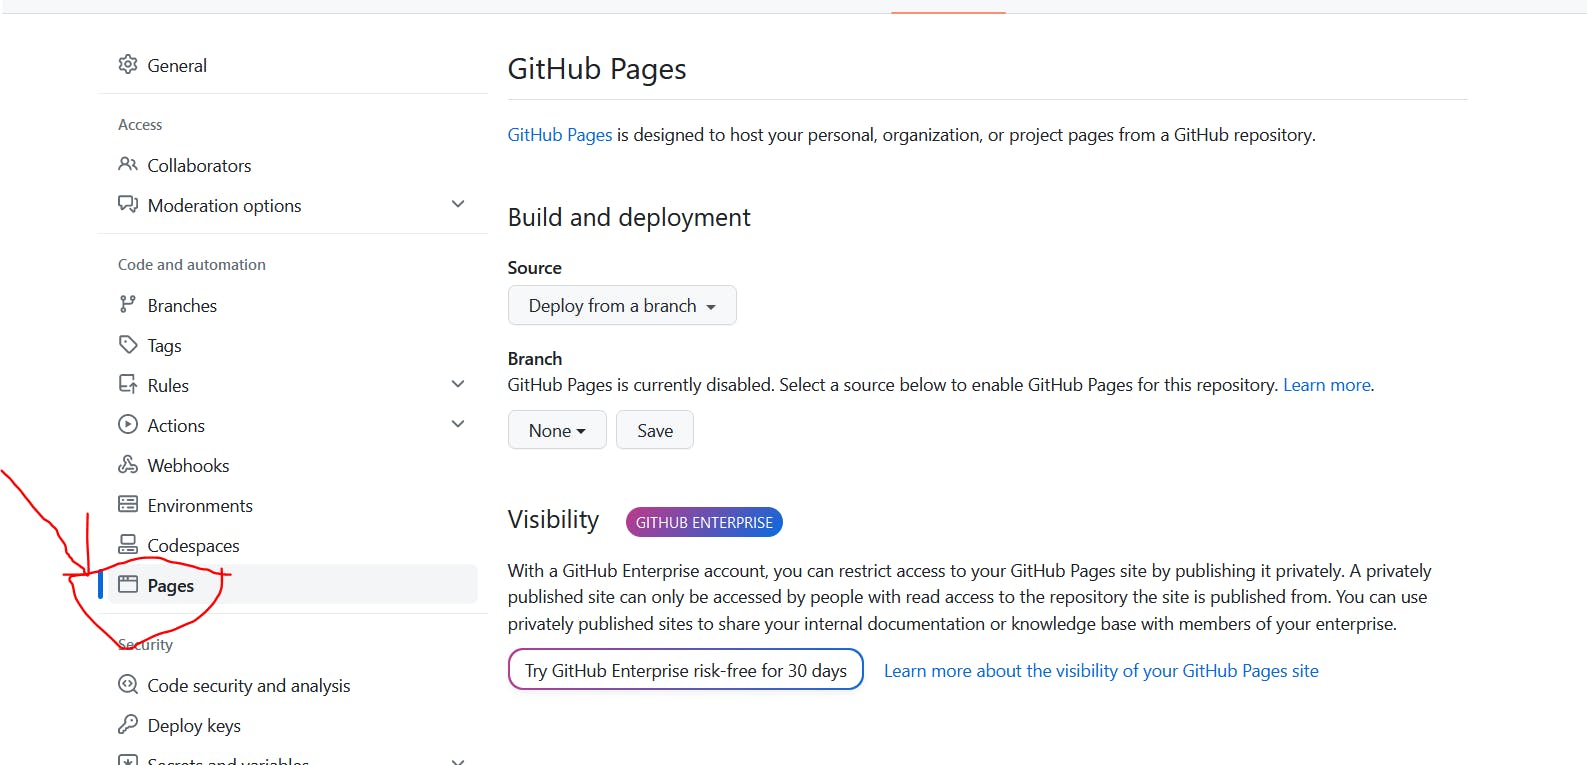
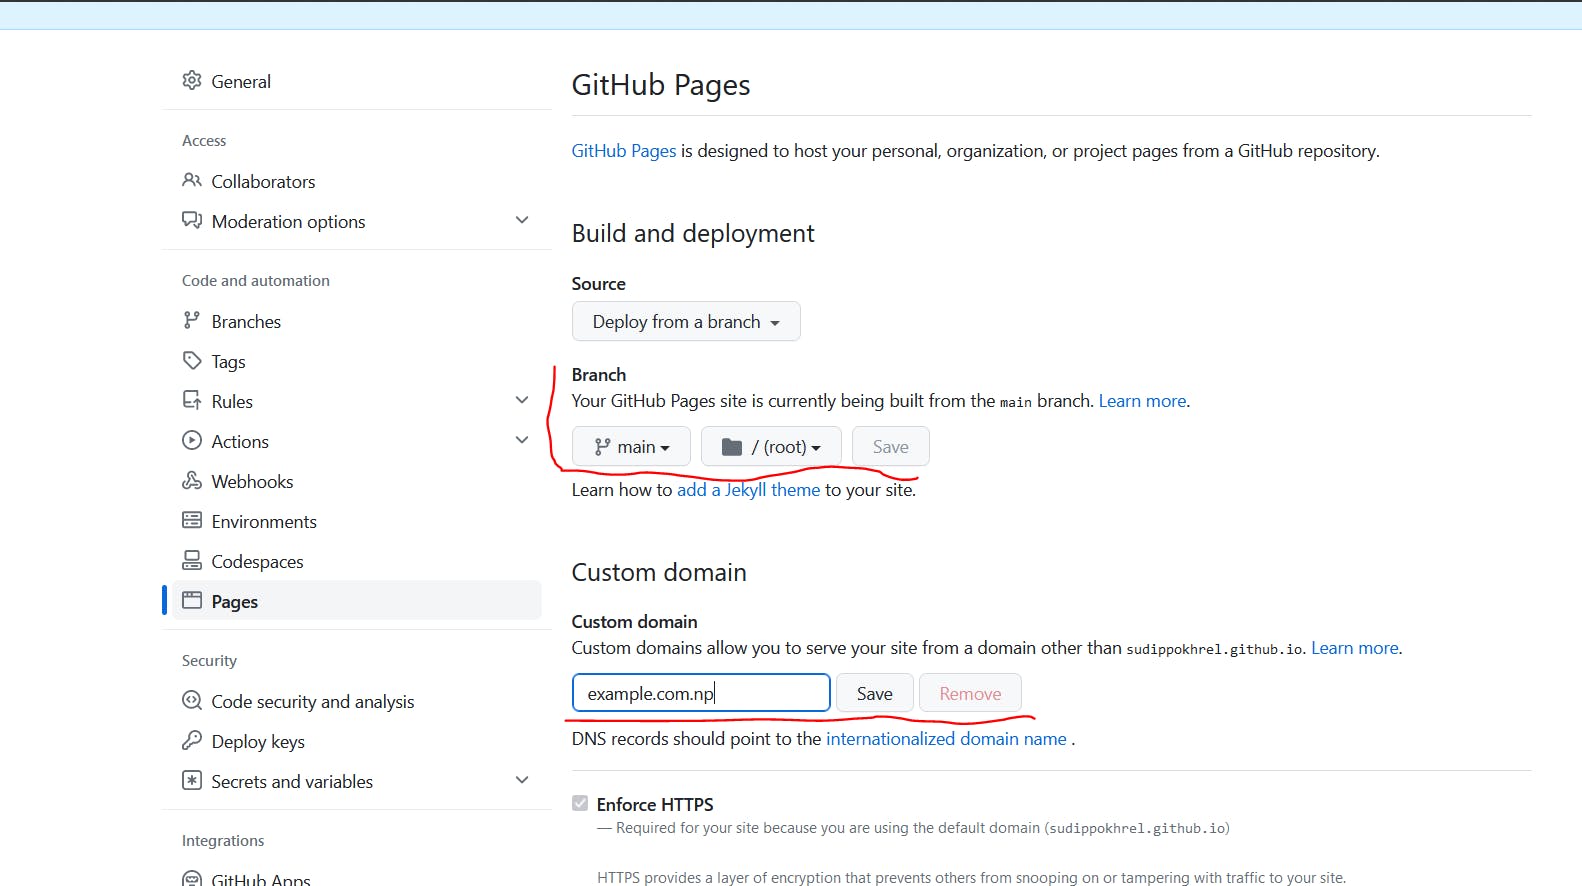
Choose Source to "Deploy from a branch" Select a Branch (the branch where your files are) and save it to Add a Custom domain and save it too.
enter the registered and configured domain name and click on "save".
your website will be hosted at your domain name. It may take a few minutes to 24 hours to configure successfully.
Conclusion
Armed with the fundamentals of domain registration, hosting and Git, you now possess the knowledge to launch your static portfolio website for free, complete with a custom domain name, courtesy of GitHub and Cloudflare.
I am always open to feedback and suggestions, so feel free to share your thoughts as you embark on your own hosting and website journey.
Let's build and evolve together!